Finally done editing the mesh, I attempted at a try at exporting the mesh using the advanced tutorial. I fail. Repeatedly. At this point, it’s getting to be the middle of the day, and I tired of wrestling around, looking for tidbits to help me to export this damn thing without problems. I settled down for a respite, seeing what was going on, and doing some alpha testing for a friend.
Hours later, and refreshed, I was ready to really dig into the process to export my modified mesh into nif format and try it out in the game, and really find out what went wrong.
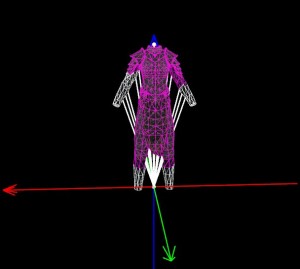
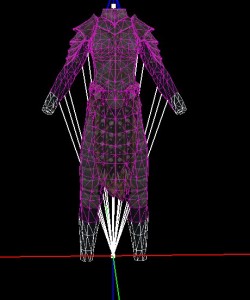
Every time I exported, I wound up with two BP_TORSO groups in the nif, no BP_RIGHTARM at all, and the faces I had set aside for RIGHTARM were mixed up with other faces and in the second BP_TORSO.
NOT what it should look like.
It turns out it may have been Nifscripts that was broken.
Preparing for Exporting
I had prepared my mesh the way described in the Advanced Tutorial, deleting the BP_TORSO that had generated when I copied the bone weights, and creating my own BP_RIGHTARM, BP_LEFTLEG, and BP_TORSO.
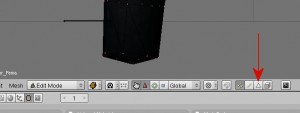
To do this, I selected the armor mesh and switched to edit mode. You’re supposed to do this in Face Select mode, so I looked around for the button to switch to that mode.
I couldn’t find it. Blender still looked as strange as an alien’s behind. I was getting used to this backwards version, but still… who was to know the face select button was WAY over there? Bah. Another fifteen minutes wasted while I scrolled through forum post after forum post. For some reason Blender 2.49 documentation just can’t come out and say it, even on the page documenting Face Select.
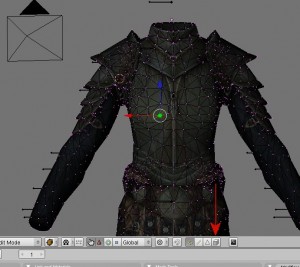
I triumphed anyway, raising my sword in victory as I happily started selecting the faces. Oh, and you’ll want to be sure that this button:
Is off. It creates some difficulty when selecting faces.
The best way, it said, was to open up the original nif in Nifskope, highlight the skin partitions, and select the faces outlined in each partition and to assign them to the brand new vertex groups I had created. Easier said than done, despite what the tutorials said!
Creating the Groups
Now that I could select faces, I opened up the original nif and placed Nifskope with the reference in my left monitor. I started with the shins, which would be assigned to BP_LEFTLEG vertex group, and selected all the faces in it until it looked like the the reference. Selecting faces is pretty annoying, I thought. You had to be careful otherwise you could select an entirely different face on an entirely different part of the body- then I figured out you could click these tiny little dots in the middle of the face you were looking at and actually select the ones you were aiming for. They were rather hard to see, but they had turned on when I went into Face Select mode.
I assigned the shin and calves to BP_LEFTLEG, and all was good. The BP_RIGHTARM faces were a little more problematic, so I inverted the selection and assigned the torso and everything else to the BP_TORSO, thinking I could snag those few, problematic faces for BP_RIGHTARM last. Don’t do this.
What I hadn’t realized is that if I did that, I had to actually remove the forearm faces from BP_TORSO- they wouldn’t just automatically remove themselves.
Exporting with a Material
I’m not entirely sure why some tutorials say to export with a material, and some don’t explicitly say to, but my friend had given me another tutorial earlier that was a bit more specific on that. After my first few attempts at exporting, I went into the troubleshooting and support thread for the Advanced Tutorial, hoping that my troubles with the fact that my skin partitions hadn’t exported correctly would be answered there. I discovered two things: one, Nifscripts were broken in the way they exported the skin partitions, and the way my exports were going were common problems. Two, one of the comments by Hanaisse made me think that exporting with a material was bad- but that conversation really didn’t give much indication either way. So, armed with this new knowledge, I went back to give it another attempt, and this time I had removed the one I added earlier. I exported- and didn’t make much of a difference in the skin partition. By this time I had gotten the link to the third tutorial and read that you *had* to have it. I was so confused at that point I reread what the troubleshooting tutorial said, shrugged my shoulders, and left it in.
I really wish sometimes, these tutorials would give a really detailed explanation of why you need something. The Advanced tutorial did this fairly well, but when using the Editing a Mesh, adding materials was almost like a footnote squished between two large screenshots.
Making sure the material is on, and added to your armor.
Anyway, by this time I had tried various methods of exporting- redoing the vertex groups, turning material off, turning it on, using all sorts of different export settings- not one damn tutorial can agree what all export settings to use, save for the important two.
Finally, after bouncing around some forums, I discovered that one reason why the Nifscripts were broken was due to it being limited to 18 bones and Skyrim used 22.
Fixing the nifscripts to allow 22 bone exports
Well, I thought, maybe I could fix it myself. I knew some scripting, so I opened up the Blender folder and started poking around in there. I got lost very quickly. The thick, fleshy branches of the script forest brushed up against my hide armor… this wasn’t going to go anywhere, and quickly. I scrolled through script after script, looking for any likely suspect to change. There were too many, and I was defeated quickly, and routed, I left my lucky sword behind. Back to the drawing board, I searched through the forums again and lucky me, I found the correct variables to change!
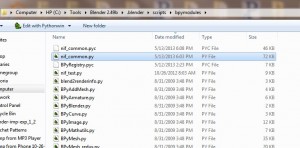
There are two, and you will need to find the proper script in your blender installation folder, .blender\scripts\bpymodules, and then find nif_common.py.
You may ask how to open that file. I recommend grabbing Notepad++. It’s a freeware program that can save in numerous scripting languages and has expansions available. I generally use it for HTML/PHP, but it’s been useful for reading debug logs and editing Skyrim.ini.
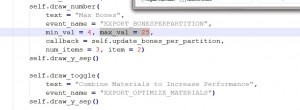
Anyway, open nif_common.py up, and hit ctrl-f. The variables you want to look for is EXPORT_BONESPERPARTITION = 18 and max_val = 18.
Change EXPORT_BONESPERPARTITION to 25, like so:
There’s a lot of max_val variables in there, however! Open ctrl-f again and this time look for max_val = 18. There is only one you need to worry about and change to 25, and it’ll have a reference to EXPORT_BONESPERPARTITION above it:
Soooo many export properties, so little time
Eventually, I had gotten fed up so much that I finished cleaning one of my earlier attempts, just to see what it looked like in Skyrim itself. Well, I can tell you that the second BP_TORSO with both arms- I had set it to SBP_HANDS. In game, Urthgerd’s arms were invisible right where where the export had messed them up.
Interesting.
During one of my scouring expeditions of the forums, I read that even having the default camera and light that Blender adds will get exported along with everything else. Uh, okay… I went back into Blender, deleted the camera and light- supposedly you can put them in another layer and turn them invisible, so if you can do that, do it, I just didn’t feel like wrestling with Blender who liked to hide things in plain sight. Now, that done, I tried exporting again- import skeleton, select all, export, name it- by this time I was up to attempt 12.
Didn’t work, AGAIN. The faces had changed around, however, so I thought that maybe was some progress. I was sort of right. I went back to make attempt 13, only this time, I realized there was an option on the export screen to increase the max bones to export. Overjoyed, because hey, that was a break, I set it to 22.
I opened Attempt #13 in Nifskope… and… IT WORKED. Well, sort of. I no longer had two BP_TORSOS, but I still didn’t have any BP_RIGHTARM, and the entire torso and forearms were selected when I checked in Nifskope. Okay, I can do this, I thought. I’ll just delete all the vertex groups and start again.
It was at this point, reading over a tutorial as I did the procedure one last time, that I realized I had to remove the forearms from BP_TORSO and assign them only to BP_RIGHTARM. They hadn’t switched completely over by virtue of just being assigned.
…and it worked. Well, it did eventually. When I tried to export, Blender gave back an error that the faces directly above the forearms weren’t assigned to anything. It helpfully selected the faces not assigned, and I went and assigned them to BP_TORSO. Those tricky groups.
Then I exported.
And a miracle happened. When I loaded Attempt #14 into Nifskope…
THE MFER ACTUALLY HAD THE RIGHT SKIN PARTITONS.
I raised my sword in TRIUMPH.
Stay Tuned for Part 6: Nif Exporting or Random Bear Attacks, Which is Worse?

