Tag Archives: learning new things

My Random Notes on Skyrim Mesh Editing

Well, I haven’t had much luck fixing that worldspace of mine with it’s LOD, and I have been doing my homework on it. I still don’t know what did it, but I did manage to get that weird floating cell ala Salvadore Dali to disappear, but I had to restore the ESP file from my back up. ALWAYS a good practice to save your changes in small steps in separate files. The LOD didn’t really work though something shows up, and there’s that whole lack of water thing. Anyway, I will write up a post all about that later, for now, here’s a few consolidated notes to remember from my meshing endeavors earlier last month, courtesy of everything I did wrong.

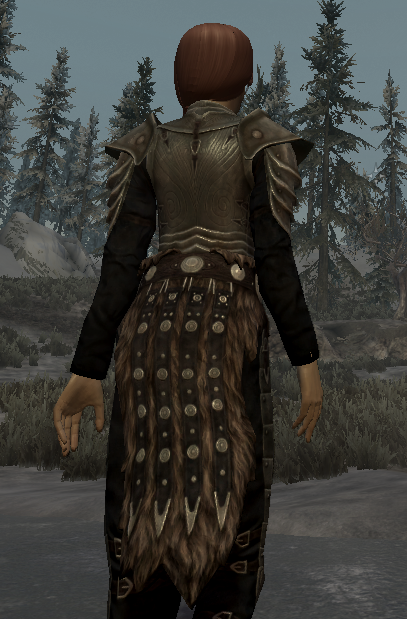
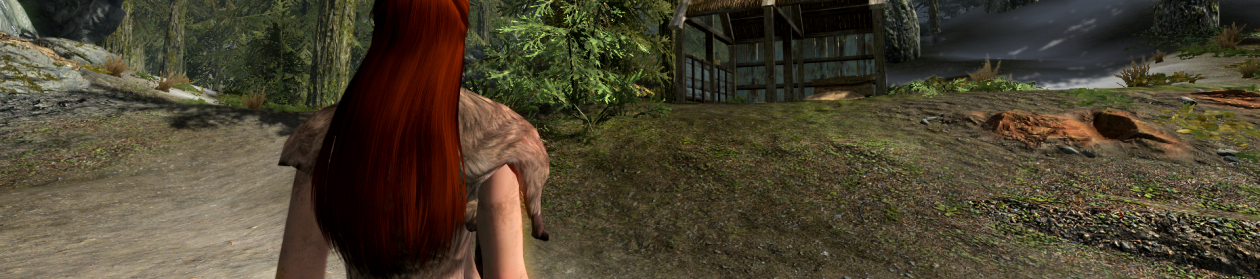
When you’re exporting an armor with parts like the Steel Plate Cuirass that use bones that is not present in the base body mesh, you should add the proper bones and bone weights before exporting. A skirt part that is supposed to move independently of the legs will show up as attached to either one leg or the other or both and will have awkward stretching.

If you’re editing an existing armor, it’s perfectly all right to use the bone weights from the original vanilla mesh if you haven’t changed things significantly. Likewise, it’s all right to use the skeleton from the original mesh as long as you import a clean one. I’ve tested both.

If you edit an existing mesh, don’t forget to check the texture and adjust the UV mapping if it’s needed.

If you’re running the Nifscripts and wind up with the wrong skin partitions or multiple BP_TORSOs, check to make sure that you do not have any overlapping assignments in the faces. If you have two BP_TORSOs and both BP_RIGHTARM and BP_LEFTLEG and the latter both have the correct assignments, and the BP_TORSO is split between the two, it’s fine. Just rename both BP_TORSOs to the correct Skyrim body value. Alternatively, try fixing the Nifscript to allow 22 bones instead of 18.

For non-armor meshes: If you get an error on importing into Blender, open up your NifSkope again and delete the value Blender reports as incompatible. You may have to re-add that value when you export.

While trying to import an arrow mesh into Blender, I discovered it wouldn’t import another property not mentioned in many tutorials: BSEffectShaderProperty.

World Spaces and Height Maps

So the first thing to do when starting a new mod with new locations and world spaces is to start creating those new locations. At least, that is what I’ve gathered so far in my research. For a decent mod, you’ll of course want to have a proper navmesh, and the only way to do that is to have an ESM file containing your spaces. It’s easier to create the basics of what you need and navmesh it, convert it to ESM, and then clutter and create your scripted scenes in an esp file companion.

So that’s what I’ve started with. For my mod, I’m creating a new world space. Two, actually, and both are islands.

The quickest and easiest method for terrain generation of any sort is to create a “height map.” If you’ve been to school, you probably know what one is. In the odd occurrence where you haven’t, a height map is an image of an area or locale with gradients in hue or shade depicting whether something is higher or lower in relation to other spots on the map.

To create and convert a height map into a form you can use in Skyirm, I highly recommend the tutorial from the good people at Hoddminir. It’s what I’ve been using to generate the height map for my island world. A long time ago, I used to create world spaces for Oblivion using a height map. This is actually a lot more easy.

You may have to fiddle around with the settings to get exactly what you want, and I had difficulty when the tutorial spoke of adjusting the height map for import into TESAnnwyn. I created several versions of my height map until I came out with something I was satisfied with. My advice, when lowering the brightness on your TIF file, is to take the eyedropper tool and click on the lightest part of your map, and then adjust the brightness until it falls within the acceptable range that Skyrim can handle. It will tell you in the color panel what gray % your highest area will be. Be warned, however, that at 76% it will generate as the highest possible mountain and if you don’t have a smooth enough gradient, it WILL create rips in the space-time continuum, as below:

hilarious

If you have a small island, like mine, what I would do (and actually had to, with this height map) was reduce the contrast until the landmass fell between 92% at the highest and 97% just before water level. It created a pretty good world.

bviere

Imagf1


I tried it with 95% to 98% and got a much smaller island.

smallerisland

Helpful Tip: If you preview your new world space in the Creation Kit, as I did, you may notice that it will only render a few amount of cells at a time. Provided that you aren’t running anything else, and that your world space is barren like the ones above, you can click File> Preferences > Misc Tab and change the “Grids to Load” from 5 to any number between that and 20. You may want to stick with 11 or 13 if your computer is lower end, but I have had success using 20 grids before. Don’t use this on larger, populated world spaces like Tamriel unless you’re absolutely sure you want to crash.

Now, LOD generation is provng to be much more difficult. My first attempt at setting up for LOD via the first method described in the tutorial was… interesting. I loaded it up in Skyrim, and coc’d my way into the world space, and found myself surrounded by water on all sides.

Oops.

Apparently, by following the tutorial, it somehow raised the water level… to… some really… really… epic depths. I had to toggle god mode on, take the water walking boots off, and swim down for three minutes straight before I hit the top of the mountain on my island. For a while I thought there wasn’t going to be a bottom.

It turns out I had forgotten to add the – before 14000.0000 for the default water height and LOD water height. I adjusted that to the right value.

TESV 2013-05-31 23-31-24-39


Flipping eggs.

Oh well, at least I’m ready for the next step: Creating LOD.

Using the CK, I loaded up the esp file and went to World> World Lod and started generating. Of course, it has crashed at least once and I am wondering if it plans on crashing again. Either way, this process is taking far too long for my taste. I think, for future world spaces I may use, I’ll probably populate it before generating the LOD.

bizzareworld


What the ever loving….

….


Okay, yeah, that looks like a Salvadore Dali.

I have no idea how this happened.

map

Well, at least the map is working. Sort of.

Back to the drawing board.

Tips for Creating an Effective Skyrim Modding Workspace

Creating a mod for Skyrim, Oblivion, or just about any other game can be a very messy, file-littering process. There was a time where I used to use the desktop for working space, and it worked well enough, except when I had to clean it off due to overcrowding. I often couldn’t remember what files were for what, and sometimes accidentally deleted files I otherwise needed.skyfold1

In order to have a functioning place on your computer, it’s wiser to create a hold-all folder where you store shortcuts to the tools you use and the folders you store your working files in. While writing the Adventuring in the Nif series, I came up with my simple, elegant solution, where before I usually stored project folders haphazardly and tool shortcuts on my desktop. “Why didn’t you read up on how to organize your working files?” Well, I tend to rely more on myself when I want to come up with something I’m comfortable with. I’m sure other people have come up with something similar. Anyway, I want to share this, because it’s useful.

skyfold3

  • Create a folder. You can place it anywhere.
    Personally, I prefer just creating it right on the desktop for ease of access, but you can have it someplace like C:\ or in your documents folder. If you place it somewhere, make sure you create a shortcut linking to it, and place it on the desktop if you want easy access to it.
  • Gather all the shortcuts to the tools you use, and place them in the folder. Here’s an example of the tools I have in mine.skyfold4
  • Next, find your Skyrim folder, the one where it holds the EXE and Data folders. Create a shortcut to it and place it in your tool folder.You’ll want quick access to this during the course of your work, in order to test, get files to edit, and generally manage your mod folder if you don’t use a mod manager. I’ve labeled mine “Skyrim DATA” to differentiate the two Skyrim folders.
  • Hunt down the other Skyrim folder. skyfold5It should be in a place like “My Documents\My Games\Skyrim,” but different systems may have this placed elsewhere. It is the one that contains your Skyrim.ini and SkyrimPrefs.ini, along with your saves and any Papyrus logs you generate.
  • Next, if you already have projects scattered around or some place you stored your projects, just move them to the modding folder unless it would otherwskyfold6ise be inconvenient. I prefer keeping all my projects in one place and don’t keep them stored in my Skyrim Data folder because I may lose them that way. Instead, I copy the files into the data folder for testing. When using the Creation Kit, this isn’t always possible to do. For things like ESP files ,you have to keep them in the Data folder to edit, but because you have a direct link to the Data folder, it shouldn’t be too hard copying the ESP and backing it up sequentially in the project folder.
  • Whatever extracted BSA files you have, for meshes or textures or sound files, place the folders in  the main modding tools folder for easy access. Keep them there in case you need a fresh copy.In the picture above. I have a folder dedicated to the female human body assets because I was using them a lot during my de-boobification of the steel plate project. A copy of the original nifs are in there, along with Blender-ready import versions, so I don’t have to go back and do it again any time I need a new skeleton or copy bone weights. As you can see, I subdivided the body into the _0 and _1 into import ready files, and created a set of .blend files of femalebody_0 with feet, hands, and head for future armor creating. The original, unedited nifs went into the original folder.

That should be about it for creating a good working folder. If you noticed, I had all my tool shortcuts renamed. This is for quick selecting, so I didn’t have to stop and think about what program I wanted to open. If I wanted to edit the nif meshes, I’d just find where it said nif editing and click. The other reason is sometimes I don’t use a tool very often and may have to try and remember what it does. This is especially useful if you take six months off and come back to realize you can’t remember what BSAextractervariety#400 you were using and liked better.

Now, you probably want a good list of programs to use. No problem.

  • Audacity – Sound recording and editing
  • BOSS – More of a general thing if you have a lot of mods. Orders mods to lessen conflicts and CTDS.
  • Creation Kit – only available through Steam.
  • Paint.NET – Has native DDS support with automatic mipmap generation. My choice in texture editing because I can’t stand GIMP and both GIMP and Photoshop require plugins.
  • TES5Edit – Cleans plugins of “dirty” edits. If you’ve ever edited something by mistake or accidentally hit OK when you should have hit CANCEL, clean it with this. Useful for general purposes if you mod your Skyrim a lot.
  • Blender 2.49b – Required for mesh editing. Nif importing scripts do not support other versions.
  • Nifscripts for Blender – If you plan on editing nifs, you’ll need the Python programs listed there as well. DO NOT download the most recent versions, use only the versions listed as required on that page.
  • NifSkope – For creating import ready and Skyrim ready nifs.
  • BSAopt– BSA extractor to extract the default files.

As for that last one, that’s the one I prefer over the other BSA extractors, but there a lot of different BSA extractors out there. Try one you may like better.

This may be specific to Skyrim, but I’m sure you could use the same principles when creating mods for other games. You just need to know what tools to download, and what folders you need to edit. Happy modding!

My Experiences Navmeshing

Yesterday, I encountered an interesting bug involving Delphine. She tried to make the Steadfast Dwarven Spider a member of the Blades. It was slightly hilarious watching her march up to the spider and administer the oath to a mute automaton. Lucky I had just saved, so I stopped Delphine from usurping my loyal mechanical follower and reloaded. … then she tried to usurp my dog. Sigh.

Anyway, today’s topic is Navmeshes. This isn’t a tutorial though, so much as a rant.

I remember doing routing in levels I had made for Oblivion. They often took a long time and was very fiddly and irritating in some respects. Or so I thought. I take back everything I may have ever said about Oblivion’s pathfinding system as the past several days have been filled with me trying to get reacquainted with creating levels after dabbling around with it when the CK first came out.

Damn the navmeshing system. Damn it to the Eternal Deadlands!

I’ve spent three days trying to tweak and improve the navmesh in this little farm mod I made for my own use. If it isn’t sunburst style inefficient meshing problems because of the large expanse I’m trying to cover, it’s the autogenerator placing vertices floating up in the air.

On top of it all, I can’t seem to get my followers to actually use the trap door, or the trap door to get a green triangle in front of it so they can. It’s been a frustrating, irritating project.

And the damn thing is only one room. One. Room. With about 60 pots of soil to grow alchemy ingredients in. I thought about releasing it for some few moments while building it. At least, I did until I started the navmeshing! For some inexplicable reason, I can deal with importing and exporting the super-fiddly nif files and edit them in Blender, but can’t do a flippin’ navmesh to save my life.

Criminy.

I’m half tempted to just let the followers float around in midair for no reason and walk all over the top of my potted plants… they’re resilient plants, right? Canis root is a stubby kind of bush anyway. Maybe it’ll prick the bottom of their feet.

AND THEN. And then, I discover that there’s been a navmesh bug in the game with ESP files where the NPCs will stop moving around after you leave, and has apparently been since the navmesh system started being used back with Fallout.

I have no idea how to convert to an ESM file (yet).

I’m having some serious doubts on starting my big mod, the Kenzeft Project… it needs custom levels for the quest line.

At this point, AAAGH. I need something to go right! For once! Just once!

Adventuring in the Nif – Homecoming

I hadn’t intended on writing a Part 8 to this series, but after setting down the blog and starting the journey over from scratch, let me tell you: it took only an hour or two this time.

I imported the fresh mesh to edit, flattened the chest out again, and this time edited the UV map. It had been a while since I’d done a UV map, so I lingered on that part getting the texture to flow smoothly again. It didn’t require much tweaking because it had only deformed slightly.

When I was done, I went through the process to export it. For a while there I had some trouble getting Blender to import a clean skeleton- for some reason it kept importing a dirty skeleton no matter how many times I closed it out. Either way, I got it working again, and exported my Plate Take 2 mesh.

It worked perfectly! Well, almost perfectly. The ankles and wrists no longer were intensely huge. I tried the mesh out in Skyrim, running, jumping, and walking, with a few other poses, and it- hmm. It was doing that stretching clipping on that flappy skirt thing the plate armor has.

clippging

I knew what the problem was. The bone weights were off, so I went back and redid the mesh a little bit so the weight painting wasn’t so red- I created a smooth transition along the flappy thing. Exported, and tested it out. It was better, but there was still something wrong with it…

To have a basis of comparison, I exited Skyrim and removed the edited mesh. Then I loaded it back up and watched how the default plate armor moved. That was when I realized, “Of course! The plate armor had all those extra bones on its skeleton.” The flap had been assigned to an entirely different set of bones. I should have realized it earlier because I had this exact same problem in modding for another game.

It was easily fixed, actually. I went back into Blender, deleted all of the vertex groups, deleted the skeleton I had imported, and started the bone weight copy again, but this time with the original nordplatef. I copied the bone weights, and then imported a clean skeleton from nordplatef instead of femalebody.

I exported the whole kaboodle and plopped it into the data folder.

nomoreclipping

It worked (mostly) perfectly.

Satisfied, I started back, ready for another good night’s sleep.

There is some clipping at the wrists and ankles, especially if you’re wearing a non-steel plate bracer and armor, but I noticed that was a problem on the original mesh when I was doing my research. I’ve never seen any character in game wear anything but a full set of plate armor,  however, so I’m wondering how worthwhile it will be to fix what the default mesh had wrong with it.

There’s a few bone weights I want to adjust for a more smooth flop to the skirt bone before I start working on retexturing this thing, but that is as it stands at this moment, and my adventure, for the moment, is done.