Category Archives: TES: Skyrim

Adventuring in the Nif – Nifferific, Part 4

When I left off last time, it was with a mesh ready for editing. Actually editing the mesh is out of the scope of this tutorial, but I do have some tips for Blender.

Use the numpad to switch between views. It’s very helpful to check alignment and how things look, especially between perspective and orthographic. You may also wish to check the render view.

Right clicking selects. Pulling on the XYZ arrows with the mouse moves the vertices along those axis.

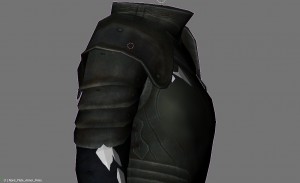
For my project, I flattened out the chestplate of the steel plate armor. Then I saved it as a blend file before going on to the next step. It’s a good idea to start saving into a working blend file while you’re going along in case something crashes.

flatarmor

I pulled the sternum forward and the cups back, and then expanded it a little bit to completely remove the cups and create some space for my femme fatales to fit into the armor, as you can see in the picture. It still has a feminine form, and to me looks much better. You may be asking why I would decide to flatten out the chest plate of the female steel plate armor. Well, um. Look at it. The default version is a one way ticket to sternum-splinstersville. In truth, because because it’s not very realistic and I prefer having more realism in my game. Besides, anyone that’s taken any sort of martial art and learned pressure points would know the answer to this question. In case that isn’t enough, here’s a really good post on Tumblr illustrating the point.

Bethesda did a fairly good job on the plain steel armor, such as Lydia wears, but a really crap job at realism on the iron and steel plate armors. Hell, they did a much better job overall in Oblivion. I’ll be doing the iron armor next. The soft leather armors and chain mail types are fine, however. They fit to the shape of the body and don’t direct the blows into the sternum. I could pad them out a bit to fit better, but it isn’t necessary.

For your project, you can do whatever you wish to your armor. Heck, give them spikes sticking out of the boobplates. Now that would be interesting.

Exporting your Nif

Now, to export your nif, you’ll have to import femalebody_0.nif. I created a blender ready version way back, so I load it in. Again, I deleted the skeleton object it imported, selected the femalebody, alt+p’d the parent out of there, and deleted the armature, and then selected the underwear and deleted that. I also had to delete a vertex group, but this time only the BP_TORSO. Now, I had the basic female body overlapping the armor (you can see some of it in the picture above sticking out.)

I selected the body object, and shift clicked the armor mesh.

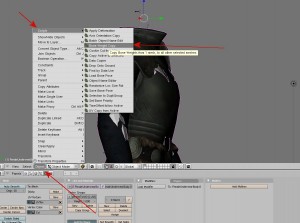
Now, I hit a snag here. I couldn’t find where the tutorial referenced Scripts >Object>Bone Weight Copy. I checked several different places, and just couldn’t find it. I did a search and checked through a few other tutorials. Still couldn’t find it! So at last, it is getting dark, I’m tired, so I set up camp and rest for the night.

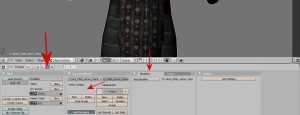
Refreshed the next morning, and at last, I found it in the first tutorial I was using. Here’s some arrows to point it out.

boneweight

Setting the quality to 3, I pressed okay. And voila! My weights are copied. Now, one tutorial says to leave it to 0, another says set it to 3. I went with the tesnexus wiki on this.

Now my armor had new vertex groups! I got rid of the fem body by selecting and deleting it because I didn’t need it anymore.

I switched back to the more advanced tutorial and went to Step 4: Create Skin partitions. If you want to know more about the skin partitions of a Skyrim mesh, check their Part 1 of the series.

Stay tuned for the next part: Hair Pulling Only Leads to Baldness.

Adventuring in the Nif – Starting to feel like a n00b, part 3

I left off last time by finally importing the nordcuirassf_0.nif into Blender.

Don’t forget to delete the default Blender cube, first.

Importing the Nif into Blender

You do this under File>Import>NetImmerse/Gamebryo. There’s a whole bunch of scary looking settings that pop up, but just hitting OK works. Unfortunately, it created difficulty with the next step. Each time I imported it, there was no skeleton to select or at least I thought so. Hmm. I played around with the import options for a bit, and not really getting anywhere, and it was now six hours from when I started. This was taking way too long. I took a look around in more advanced tutorials to realize that the tutorial I had been using had outdated settings compared to the version of Blender I was using. Time to start again. I went out to check other tutorials, came back and reconfigured the import.

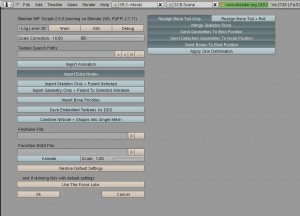
There were several new options in the version of Blender I was using, 2.49b, and some of the tutorials were made with the earlier versions. These are the settings you’ll need:

settings


If you’re looking at this from the future, it may look different for you. WoooOooOoo!

A good tutorial

By this time, I finally, FINALLY hit upon a tutorial that is both thorough and still explained simply enough that a nif-newb can understand it.

I’m thanking my lucky stars because, seriously, it was about time. The one thing I dislike about having to go through tutorial after tutorial is sometimes they skip or touch on really important steps like they expect you to know it. It’s maddening.

Anyway, there is my steel plate armor, in all its boob-plate glory. The tutorial, like others, says to delete the skeleton. Interesting.

skeleton

Right click the skeleton until it turns pink, and press delete and select OK. Then select the object and hit alt+p, and “clear parent.”

Next, you need to delete the armature and the vertex groups.

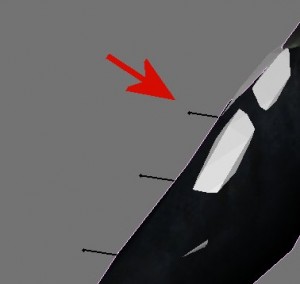
armature

You’ll need to select the object (right click on it, it’ll have a pink outline) and make sure you’re in the correct panel, where the large red arrow is pointing. The two smaller arrows show where the armature and vertex groups will be found. For armature, click the X button next to where it says armature. For vertex groups, hit delete. You should be done when it looks like the picture above. If you’re confused, the tutorial linked above also has photos. I was ready to start editing, for the most part.

Adding the Texture

When I came to step 6 on that tutorial, it showed their thief armor covered in the texture. I was changing some of the basic structure of this armor, and having the texture on it so I could see how it was affecting the UV map is useful. You can see above I finally figured out how to do it, but at first I was frustrated. I hadn’t touched Blender in a long time (and it was different version) and sometimes the ways you do things changes slightly on different Blender releases.

To add the texture to your model, you first must have extracted it from the texture bsa. It should be found in the same kind of folder structure as in meshes. I copied everything with the nordcuirassf.dds, nordcuirassf_m.dds and nordcuirassf_n.dds into my project folder.

Now, I’m assuming you know how to use Blender at least somewhat. If you don’t, there are literally thousands of Blender tutorials out there for you to use. However, the only thing we really want to deal with is the UV mapping. Here’s a video tutorial that nicely covers it, though Mr. Krakow goes a little fast and you may have to listen to it a few times.

The important thing you need to know is to make sure all of the vertices in the armor is selected (check in the editing mode,) then open a new view window, set it to the UV map, click image, and open. I selected my nordcuirassf.dds in my working folder, because the others deal with the normals.

Finally, I was ready to move those vertices around!

Adventuring in the Nif- Re-learning Nif for Skyrim, part deux

Still installing the tools…

I hold my breath eagerly as Python’s GUI loads, a small pop up informing me that Windows is configuring Python…

And there it is. The flash of light, the screen now displaying the simple window, cheerfully proclaiming I have 2.7.4 32 bit. With Python firmly installed now, I look forward to, you know, actually being able to open up a damn nif file.

Lucky me that I didn’t choose Python 3 to update to. Unlucky me, it is still going to take a bit more set up.

PyFFI is the next thing on the list, which has the ridiculously narrow margin of 2.1.9 and above but not 2.2.0 and above. What is wrong with these people. I chose 2.1.11.

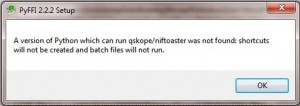
Naturally, during install, I get this message:
wtfno

Are you kidding me.

Then I realize the problem was, somehow, someway, the fileserver gave me 2.2.2 instead of 2.1.11. I’m 100% certain I was in the correct folder, because I clicked the damn file from here! The internet itself! Rising up to place blocks in my way.

It has now been two hours since I started installing my necessary tools. Obviously the forces of the Enemy are strong today… requiring me to watch carefully my moves from now on. I grip my mouse fearfully, stepping into the next room, fully expecting to be jumped on by draugr at any moment…

PyFFI installs properly and recognizes that I have both Python 2.7x and Blender 2.4x. Whew.

Finally, I come to Nifscripts, download and select the EXE… and all too cheerfully it informs me I need Python 2.6.6 and that clicking OK will take me to the Python download and to rerun Nifscripts installation.

My reaction is even less stellar. By this time, I’ve settled in for the long haul and turn on a Star Trek staple episode.

Uninstall 2.7.4. Install 2.6.6. Check the version… and Nifscripts finally works!

So, what did I learn from this all? Even reading installation instructions is misleading. Don’t trust them.

What you actually need:
Blender 2.49b
Python 2.6.6
PyFFI 1.1.11
Nifscripts 2.5.9

Despite assurances of other tutorials that you can use other versions of Python and PyFFI, you have to bow down to Nifscript’s highly picky installation. As of May 2013 this is the best set up I could get.

Extracting the NIF files

To actually use nif files, I have to extract them from the Skyrim – Meshes.bsa. This shouldn’t be too much of a problem. I used to do this all the time with Oblivion, and it was pretty easy back then. Despite other tutorials that tell you to use some Fallout extractor, there’s more general BSA extractors that will detect what game you’re using. Back in Oblivion, I used BSArchive to extract things, but I lost it long ago. I already have an BSA extractor from when I needed textures to start from for my Starry sky replacer, so I used it to extract the meshes I need.

If you need one, however, go to the Skyrim Nexus and looking for BSA  extractors gave me TESArchive, BSAUnpack, and BSAopt. Of the three, BSAopt works best for me and allows me to unpack the textures without a bunch of confusion.

Creating your project folders

I created a working folder called “de-boobified steel plate armor” to store my working files in, and a folder called “female body assets” to store the files from the female body, which I’ll need during the process to make my steel plate armor. Extracted meshes and textures get their own folder in case at any point I need untouched copies.

In the BSA archive, you’ll find them under actors>character>character assets. For armors, the one I want is listed under armor>nordplate. I needed nordcuirassf_0 and nordcuirassf_1 for my project. These are the files I’m going to edit.

A note about bodies and armors

The reason why you need femalebody_0 and femalebody_1, and nordcuirassf_0 and nordcuirassf_1 is because of the body slider. Skyrim introduced the “weight” concept, although in some cases of body replacers, cup and butt size. The game engine only needs two models to work this amazing magic: the skinny version, _0, and the heavy version, _1. Anything else on the slider, Skyrim will combine the data from the two and come out with all values in between. Kind of clever, if you ask me. When I worked with the Sims 2 models, when sims got fat or skinny there was no middle ground- suddenly they would look down and a gut would appear.

Anyway, it is much easier to design something for the smaller body and then adjust it to fit the larger one, so the best way to start is using the _0. When you import the _1, you can move the individual pixels until you fill out the armor. This is, of course, the COMPLETE opposite of making a real life outfit where you go larger and take things in to fit.

Editing with Nifskope

Finally getting into Nifskope, it appears that there needs to be some changes to the nif file before I import it to Blender.

Under NiHeader the user version must be changed from 12 to 11, and user version 2 must be reduced from 83 to 34. And all NiTriShape nodes must have their BSLightingShaderProperty branches removed. A slight inconvenience during this phase was, while you look for NiHeader’s User Version and User Version 2 in the panel below, you need to use the upper panel next to the 3d display to expand NiTriShape. Otherwise, the BSLightingShaderProperty will appear grayed out.

In the upper panel, I had to expand NiNode before I saw the NiTriShape nodes to edit. One of the files I am planning to use is femalebody_0.nif, so there were two NiTriShape nodes and therefore two BSLightingShaderProperty branches I had to remove. I did this by expanding each NiTriShape node, and right clicking BSLightingShaderProperty and selecting Block>Remove Branch. I did the same for nordcuirassf_0.Saving the nif under the name femalebody_0_blenderready.nif and nordcuirassf_0_blenderready. I opened up Blender and imported the file.

Five hours after I started my adventure, I was ready to edit. Then I realized this version of Blender was as alien looking as a horker’s backside.

Watch for Part 3.

Adventuring in the Nif – Re-learning Nif for Skyrim

Oh, boy, am I mad this morning. I woke up only to find that my new TV/Monitor wouldn’t turn on. I’ve been having this issue with it for a few weeks now, but usually a hard reset would work. Not today. So of course they want me to send it in, being under warranty. In the mean time, I’m back on the two itty bitty monitors. Blergh. Already missing my 1900×1080. Knowing my luck it will likely be two months before I get it back.

Putting that aside, it’s a new day for learning something. Back in the Oblivion days I had made some small models for things like swords, bows, and books. It had been a long complicated process to do, well, pretty much anything with Bethesda’s beloved NIFs. It still is.

It has been long enough that I don’t even remember how to do it, and hey, it’s been five years. So, it’s about time to break out the tutorials. This post is mostly going to just be my notes on it, for my own personal use, but if other people can benefit from it, why not.

From my initial observations, you need Blender, Nifscripts for Blender, Nifscope, and GIMP.

“Why the hell would anyone want to use GIMP?” That’s my question. GIMP is lame. I already have it, but if it’s for the DDS editing, I far prefer Paint.NET*. I’m holding my breath on this one. If the tutorial needs it for some specific task only it can do, then maybe.

Blender’s a bit out of date by now. So I fix that and update to 2.6.7. Then I realize that even the more recent tutorials say that Blender’s nifscripts only work for 2.49b. Flipping-… Well, easy enough to install a second version of Blender into my Tools Folder.

…and this version of Blender requires Python. I have Python. Oh- you wanted an UPDATED Python, that’s dif- what do you mean Python doesn’t have 2.6 up on the website anymore? I guess I’ll take 2.7.4 then. Hurrah! It works. Then I realized I had 2.7.2 in the first place.

I install 2.7.4 anyway just because it’s good having latest versions of everything, right?… only to read in Nifscripts installation that it has to be 32 bit because 64 bit lacks xml parsing.

Flipping eggs.

Now for Blender Nifscripts. You really need to be careful here about what tutorial you’re using and where to get the nifscripts. Some otherwise updated tutorials linked me to an older version of nifscripts, which confused me for a moment because my downloaded file (the correct, latest version) and the file they wanted downloaded did not have matching filenames. Make sure they’re definitely the latest version. As a good rule of thumb, this NifTools page may be the best place to check.

Then I realize there’s a note on that page.

So here’s the divvy. You need:

Blender 2.49b
to work with:
Python 2.6 and above but NOT the 64bit version
and the latest:
Nifscripts for Blender, which doesn’t support Skyrim.

Flipping flying freaking eggs.

Why does this have to be so hard. I just wanted to de-boobify the steel plate armor….


*As for why I prefer Paint.NET: You don’t have to install plugins to get it to open dds files, because it does it natively, and also generates mipmaps if you don’t feel like doing it yourself. I’ve had some pretty good success with my O Starry Night mod where GIMP and Photoshop both had issues even displaying DDS for me. The stars texture is heavily transparent, and neither program displayed the transparencies very well reading from a dds file. The one thing I find is a drawback to Paint.NET is it lacks some useful brush tools and a lot of the functions that are in Photoshop. Transferring the image is the major difficulty with that drawback, as there is no file format that you can save to that supports both layers and transparencies either Photoshop or Paint Shop Pro can open. I generally solve that by saving all layers in transparent lossless PNG formats and reassembling it in Photoshop or Paint.Net. Creates some clutter, but it works to import and export, and you get backups of each layer in case you need to import a fresh copy of layer X but not of layer Y.